Welcome to my Blog!

Hi there, nice to have you visiting! I'm Heidi and this is the blog for Heidi Bears. Here is where I post all the happenings in my work and daily life. Here and there you'll find info on things that have caught my attention as well as the odd tutorial. I hope you enjoy your visits. I love to have feedback, so leave me a comment!

Friday, February 25, 2011

Share your Project


I love taking photos...yes, I am the irritating mom who always has a camera, and is yelling "Look here..." so of course my children (God bless their little cherubic souls), have devised ways to evade the "perfect family" look.... They really are clowns, and every photo opportunity is also an opportunity to see how long mom will keep at it before giving up and reaching for the wine... ;)

Today is also Project Share 2! Please, upload photos of your WIP / FOs...we all want to seee.....

I have started this week on a pair of fingerless mittens in a wonderful BFL superwash, and also a secret project using African Flower Hexagons....

Have a great weekend, and thank you to everyone who stops by and leaves a comment!


Wednesday, February 23, 2011

ColourSpun Mohair Club: Autumn


Our Knitting Club met today, and along with our friend Dana, my wonderful ColourSpun Mohair Club Yarn came as well! This collection of hand dyed mohair and kid silk were hand dyed by Dana, with the colours of Autumn being the inspiration.


The pictures I have posted really don't do justice to the beautiful colours...


Dana also included a lovely felted autumn leaf brooch...thank you my friend!


You can find details about the club here, and here...


I think I will knit myself a mitered square scarf for winter... this brushed mohair and kid silk yarn is soft enough to wear against the skin...

Please get all your photos ready for Project Share on Friday...I am looking forward to seeing everyone's FO/WIP!

Sunday, February 20, 2011

African Flower Hexagon Join-as-you-go Tutorial

Today was a quiet day...we spent it at home, just pottering about. Gerry had to go and do rounds, and the kids did homework while I photographed the tutorial. It was a warm, sunny summers day here in SA, and the kids spent the afternoon swimming....

A visitor asked for a tutorial on how to join-as-you-go when you are crocheting African Flower Hexagons... here you are ....


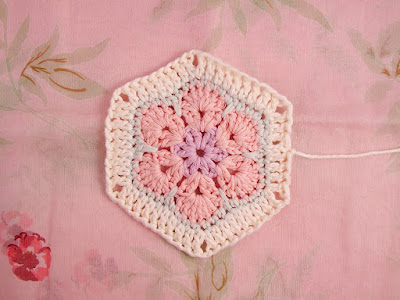
Start with one completed hexagon. Crochet a second hexagon, up until you are crocheting the last round. Proceed as follows...


At the apex of the flower petal, (where you will do 2 DC into the same space , with a chain stitch in between), work up until you have made ONE of the 2 DC at the apex of the petal.


Chain 1 st.


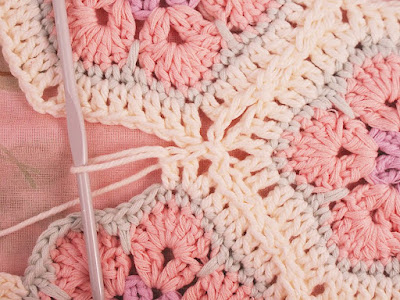
Insert your crochet hook as shown, through the little hole of the other hexagon, at the petal point.


Yarn around hook.


Pull yarn through both the hole and the stitch on the hook.

Yarn around hook...


Chain 1 st.


Yarn around hook again, and DC into the SC loops of the round before...just as above...

(NOTE: I have just noticed that I have made a mistake by DC into the next SC space, instead of doing the second DC into the SAME SC SPACE...sorry :( only noticed now...but the you can ignore my mistake and continue exactly in the same manner as described...)


Completing DC.


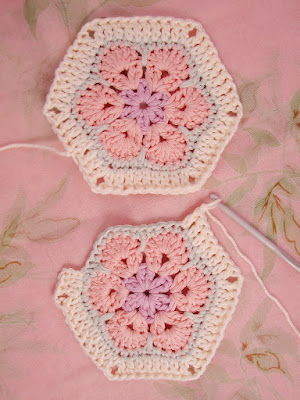
Second DC into same space completed. Your work should look like this picture above.


Continue to crochet DC as per the pattern, until you have THREE DCs as seen above.


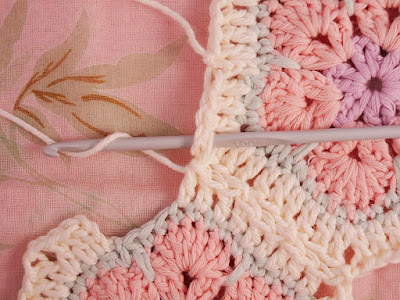
Insert hook in the hexagon you are joining to, at the place where there are THREE DC from the
point where you joined the corners, as shown above...


Yarn around hook...


Pull through...and DC into the next SC loops of the previous round (just as you would crochet the round as per the pattern)...


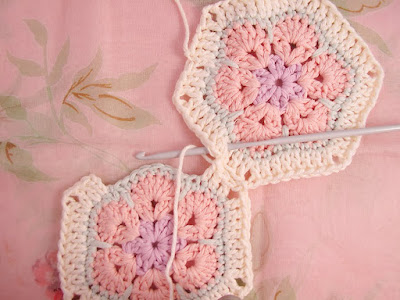
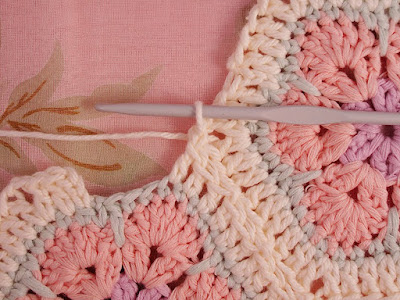
Continue to DC until you again have THREE DC from the point at which you joined to the other hexagon...


Join at the place on the other hexagon, at the point where there are THREE DC's from the join...you are matching DC for DC, so that your hexagon doesn't get joined in a wonky way...


Here is a bigger picture for you to see...


Yarn pulled through...


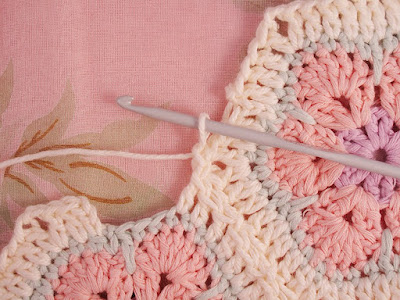
Again, make THREE DCs ...you are now at the apex of the petal, where you will make two DCs into the same space with a chain stitch in between (just as per the pattern)...


Now insert your hook, into the little hole in the other hexagon, and yarn around hook (just as before)...


Pull yarn through...


Chain one stitch...


Make a DC into the same space on the green yarn round, as the previous DC...


Continue as per the pattern, and finish off the hexagon as you would normally...


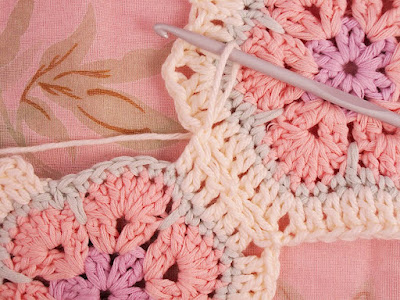
When you want to join a second round of hexagons, you need to follow the previous steps in exactly the same way, until you get to the corner join area, as seen above...


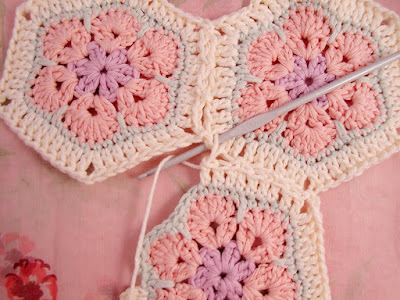
When you get to the corner, insert hook into the little hole of the right side hexagon, just as you would in the previous steps, yarn around hook...


Pull yarn through...


Chain one stitch...


Insert hook into the second little hole (as seen above ) of the left side hexagon, and yarn around hook...


Pull through..


DC into the same space as the previous DC, and continue your joining as before, every THREE DCs...

There you go....how to Join as you go!

Saturday, February 19, 2011

Hoo are you?... and a Bobble Cast Off Tutorial


What a week we've had! It's been really good albeit difficult, as Gerry has needed a lot of help with his fractured shoulder. However, it is healing nicely and I am glad to report that he has started moving his right arm a bit, all the while being back at work... He had another CT this week, with a 3D reconstruction to make sure that the fracture didn't extend into the joint. It's really quite amazing what modern medicine can do... (if any of you are interested I will upload a 3D reconstruction CT image to show you ), and I am endlessly grateful that almost any traumatic injury can be treated if therapy is started early enough...

I have had a good week and a sad week in the ICU. We are full (as usual), but this week saw some very sad situations.
Gerry was called to see a young boy who had tried to commit suicide, and although he tried everything possible to save the child's life (including extreme measures), the child died. It has caused tremendous upset and sadness for us, as well as the hospital staff involved . We learned that his friend had committed suicide the evening before, and that there had been a pact between them to do so. It's a desperately sad situation... On a more positive note, a sweet old lady who has been with us for over a month, and at one point critically ill, is ready to leave! She is now thoroughly irritated with being in ICU and scowls at us when we ask her how she's feeling :) (this is actually a good sign...patients who are critically sick don't scowl at anything...)

On the knitting front...I have been designing a fair isle pattern, and hope to have it finished for show and tell next week :) I am working on an African Flower Hexagon join-as-you-go Tutorial...hope to have it up soon :)

Right! Onto Hoo are you # 32...


What did you get/give for Valentine's Day?

I gave the girls some adorable soft toys , cow and horse little bags, and a cool muticoloured pen (you know the type...ten different coloured nibs in one...beats me but they loved them!) They made me an absolutely beautiful card with lovely tear jerking stuff written inside....
For Gerry, I organized to have an entry for an exclusive mountain bike race (unfortunately he will not be taking up the place ;) ). Gerry bought me an antique amethyst ring.

Do you have a vacation planned in the next couple of months or in the summer?

Yes, we are going skiing in France in April.

What is the one thing you do to pamper yourself?

Have a back massage...

What sparks your interest in other people's blogs?

I love to see a well laid out, clean looking blog. That's the first thing that catches my eye.
Regular posting is also important...I may feel that I am getting to know someone, and then look forward to reading more, and boom!...no posts for weeks! I love creativity... so blogs that feature creative elements are always a draw. I love humour, and honesty and positive attitudes. I also like to hear something of the blogger's life, their days, activities etc. And most importantly... a friendly disposition...


What kind of mood are you in today?

I am happy and incredibly grateful for the good in my life. That's not to say that I don't have some hard days, where maybe things aren't easy or understandable, but I am simply thankful that my problems are small in comparison to what some people are experiencing. I am grateful for health, healthy children, a wonderful husband, precious friends and family, and a new hope for every day. Unlike a lot of people in Africa, I have choices and options and my freedom, and I recognise that these are indeed precious!


Bobble Cast Off Tutorial

Right...ready to go? When you have reached the end of your project, and you are ready to cast off, proceed as follows...
Knit 2, cast off one stitch.


You have one st on the RHN.


Knit another stitch,

...and cast off a second stitch.


The next stitch will be the one that you make a bobble into. The bobble is made in exactly the same way as described in the Bobble Cast On Tutorial.


Above you can see the first row of the Bobble has been made...


The bobble has been made, and you will now slip the stitches to finish the bobble (exactly as in the Bobble Cast On Tutorial).


The bobble stitches have been slipped, you have 2 sts on your RHN.


Cast off the right sided st on the RHN off (over the bobble st), as seen above.


Above you have the bobble made and all sts cast off.


...next Knit a stitch...you have two sts on your RHN again.

Cast it off. One stitch on RHN. Repeat this so that you have cast off 3 stitches including that of the single bobble stitch. Make a new bobble into the next stitch on your LHN. Repeat until the end of the row and all sts are cast off.


A small note:
In the picture above you can see that the first bobble is smaller than the other two. I found that for some reason, (even using the same yarn and needles ), I needed to add an extra Knit row and an extra Purl row to the bobble, in order to make it the same size as the bobble made in the Bobble Cast On. I am not sure if this is just me, but if you are making something that has two bobble edges, you may want to experiment with the bobble size of the cast off, so that both your bobble edges match. The bigger bobbles were made with these extra rows, and they are the same size as in the previous tutorial.

I would love to see your projects that have a bobble or picot edge...please upload them to the Friday Project Share post next week :) I look forward to seeing everyone's WIP/FO's!

Have a good evening folks,